Wednesday, August 31, 2011

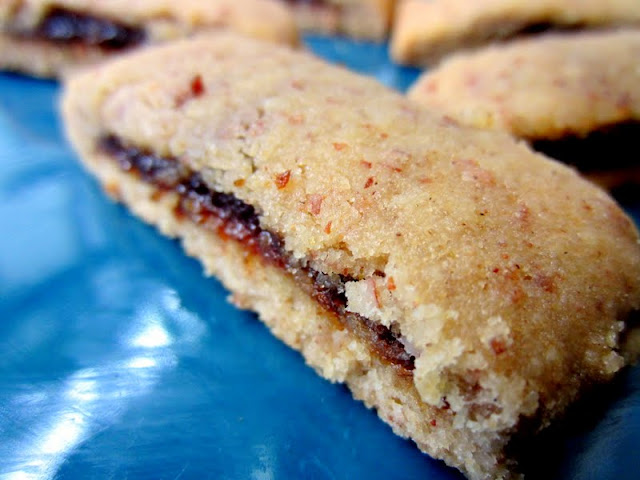
Chewy (Better Than) Fig Newtons


Who doesn't love fig newtons?  Seriously, if such people exist, I have not met them. 

I don't know exactly what made me crave them last week.  It may have been because the last time I was at Trader Joe's, I came across a new product that made me want to jump in the aisle.  Fig butter!  And it was so cheap.  Needless to say, I stocked up, afraid that it would disappear quickly, like other favorite TJ's products that have vanished oh-so-suddenly from the shelf, leaving me standing forlorn in the aisle (cranberry chutney, I'm talking to you!).

These are super simple to make - I swear.  You mix the dough, spread it on parchment or wax paper, spread the fig butter over half of it, and then fold it over.  It's like a little fig burrito.  AND - they are gluten-free, dairy-free, and egg-free.  Seriously. 

For my first attempt, I tried this recipe from Elana's Pantry just as she made it.  They were tasty, all right - but I didn't feel like they had the heavier texture of fig newtons that I was really looking for. 

So I innovated a bit.  I tweaked the flours, adding some more whole grainy goodness to balance out the plain almond flour.  I made the dough a little drier, and substituted applesauce for some of the fat.  I baked them for slightly less time. 

They came out so wonderfully, even I can't believe it.  I brought these into work with me, and my co-workers couldn't believe they were gluten-free.  One woman liked them so much that she kept checking in with me to see how many I had left, torn between taking one at the expense of someone else and just, you know, really wanting another fig newton.

But maybe you'll think of some other, new way to make these that will be even better.  If you do, please share your own tweaks with me.  Until you come up with your favorite version, though, these will definitely hit the spot for a fig newton craving. 


Chewy Fig Newtons
Makes about 40 small cookies

1/2 cup almond flour
1 cup + 1 tbsp. sorghum flour
1/4 cup tapioca starch
1/2 tsp. salt
1/4 tsp. xanthan gum
1/4 cup agave nectar
2 tbsp. honey
2 tbsp. canola oil
2 tbsp. applesauce
2 tsp. vanilla extract
6 (or more) tbsp. fig butter (you can buy this at Trader Joe's or use any other fig jam/butter)


In a small bowl, combine the flours, salt, and xanthan gum and mix together well.  In another small bowl, combine the agave nectar, honey, oil, applesauce, and vanilla and mix well to combine.  Add the wet ingredients to the dry ones and mix together until it's as smooth as it can be.  Cover and refrigerate for at least an hour.

Preheat the oven to 350 F. 

Remove the dough from the refrigerator.  Take about half of it and plop it onto one side of a large piece of wax paper.  Fold the wax paper over in half and use a rolling pin to make an even rectangle that is about 10 - 12 inches long and about 4 inches wide.  Peel back one half of the wax paper (so that the top of the dough is now exposed) and then transfer the whole thing to a piece of greased parchment paper for baking.  You can do this by greasing the parchment paper, then pressing it onto the top of the dough, then flipping the whole thing over and peeling back the rest of the wax paper (which will now be on top).

Spread a generous amount of fig butter along one half of the dough - as much as you want, really.  Go crazy.  Make them figgy.  Then, using the parchment paper to help you, fold the dough in half.  Peel back the parchment paper carefully from the top of the cookie.  Use a knife or fork to tuck in the dough fringes so that none of the fig butter is exposed. 

Place the parchment paper on a baking sheet and bake at 350 F for 10 - 13 minutes, or just until the dough is set and is ever-so-slightly browned.  It may not look totally done - that's ok.  Remove from the oven and let sit on the pan for about 3 - 5 minutes, then, using a sharp knife, cut into little fig newton squares and cool on a rack. 

Repeat the process with the other half of the dough, or freeze it to use later.  Keep refrigerated, but leave out at room temperature or zap in the microwave briefly before serving for the best flavor.

Friday, August 12, 2011

Decadent Lemony Berry Coffeecake


Uh, yeah.  That cake tasted as good as it looks.  Better than it looks, if you can believe it.

I know this isn't technically a post for the Gluten-free Ratio Rally, but I feel this need to profess the power of the ratio again.  Because Oh. My. God.  This cake is seriously amazing.  Like, out-of-this-world good.  And it is possible because of a ratio.

My cousin was visiting me last week, and it was a total food bonanza.  It's sort of our thing.  We wander around grocery stores, and we talk about recipes.  And when we're in the same physical space, we cook and bake.  A lot.

After a trip to Boston's Haymarket, we came home with bags of fresh berries - probably about 2 pounds of them.  We had cherries, strawberries, and raspberries - and they were just begging to be part of something baked and delicious.

Done and done.  I consulted the ratio that Ruhlman has in his book for sponge cake (which is one part each of flour, eggs, fat, and sugar), and then we innovated a little with the flavors and flour blend.  I'm always one to reduce the fat and substitute something else, so I used applesauce to keep it moist.  And actually, there's more applesauce than fat in this cake - only 6 tablespoons of Earth Balance buttery spread in the WHOLE THING.  Think of how many extra pieces you can eat with all those fat calories you're saving (I know my cousin and I thought about that.  And then we definitely ate those extra pieces.).

And the result?  My gluten-eating, cake-loving cousin said it was the best cake she'd ever eaten.  The word "phenomenal" was dropped multiple times by both of us (in between mouthfuls).  I brought pieces around to my co-workers, who dubbed it "wonderful" and "delicious."

So you can make this one for mixed company, is what I'm saying - for gluten-eaters and gluten-haters alike.  Barring berry-haters, I suspect everyone will love it.


Decadent Lemony Berry Coffeecake

**Please note that all measurements given below in cups are approximate, as I used my kitchen scale to make this cake and used an online converter to figure out the volume measurements.

4 eggs
8 oz. white sugar (~1 cup)
3 oz. Earth Balance Buttery Spread (3/4 stick or 6 tbsp.)
5 oz. applesauce (unsweeted, natural) (~1/2 cup)
1.5 tbsp. lemon juice
1 1/4 tsp. lemon zest
1 1/4 tsp. vanilla
3 oz. tapioca starch (~3/4 cup)
2 oz. sorghum (~1/2 cup)
3 oz. brown rice flour (~1/2 cup)
(OR 8 oz. of your favorite gf flour blend)
2 tsp. baking powder
1 tsp. salt
1/4 tsp. xanthan gum
3/4 lb. berries, chopped into small pieces (we used cherries, raspberries, and strawberries, but you could use any dark berries you think would go well in this)

For crumble topping:
4 - 6 tbsp. brown sugar
1/2 tsp. cinnamon (or more to your own taste)
2 tsp. Earth Balance Buttery Spread

Preheat the oven to 350 F.  Spray a glass 9" x 13" baking pan with cooking spray and set aside.

In a medium or large mixing bowl, beat the eggs (preferably with an electric mixer) with the sugar until it's frothy.  Add the Earth Balance, applesauce, lemon juice, lemon zest, and vanilla and mix until it's well incorporated.

In a separate bowl, whisk together the flours, salt, baking powder, and xanthan gum.  Add about 1/3 cup at a time to the wet ingredients, beating on medium speed until the batter is very smooth.

Pour the batter into the 9" x 13" pan.  Press the berries lightly into the top of the batter.

In a small bowl, combine the brown sugar, cinnamon, and Earth Balance.  Mix with your fingers until it's finely crumbly.  Sprinkle the cake generously with the cinnamon sugar crumble topping.

Bake at 350 F for 45 minutes or until a toothpick comes out clean.  Let cool for as long as you can stand it before eating a piece (we lasted 20 minutes).  Keep refrigerated once cooled.  It's fantastic if you warm it slightly in the microwave before eating.

Wednesday, August 3, 2011

Banana Rum Cupcakes with Rum Glaze for the Gluten-free Ratio Rally


Soft. Fluffy. Spongey. Moist. Tender. Crumbly. Cake-y.  

Sadly, those usually aren't the first words that that come to mind to describe many gluten-free cakes I've tried from the store.  But that, up there?  That is a cupcake.  A real cupcake.  It is all of those words, to a tee.  And what is behind all of those happy descriptors?

A ratio.  A beautifully simple ratio.


Our host for the Gluten-free Ratio Rally this month is Kate of Gluten-free Gobsmacked.  She's inspired us all to make some delicious variations on white and yellow cake.  Check out her blog for her recipe for Basic White Birthday Cake (I could have used this a few weeks ago for my own birthday!) and for links to all of the other fantastic recipes the members of the Rally came up with (which you can also find at the end of this post).


Sometimes the ratios that Ruhlman describes need a little tweaking.  A few adjustments; a little less flour here, a little more liquid there, an extra egg here, a dash more sugar there.  But for me, his ratio for sponge cake worked perfectly.  One equal part each of flour, butter, sugar, and egg gave me a cake with an incredibly tender crumb, and a beautifully brown and spongey top.  It tasted like real cake - the kind I remember from my gluten days (you know, the kind that made me sick, but was delicious - but that's beside the point.)

Of course, I had to do SOME kind of tweaking to make it my own.  One of my absolute favorite cakes ever is my great aunt Gene's rum cake. (Whenever I see the cover of the cookbook Heirloom Baking with the Brass Sisters, I always think of aunt Gene and rum cakes, for some reason - I think it makes me think of other, older times and places and scraps of paper tucked between the tattered pages of cookbooks, holding the keys to unlock the secrets of the most delicious things your family has passed down.)  I wanted to make a cake I could drizzle her rum glaze over, so I used some banana in place of half the butter to balance out the rum flavor (which also had the added advantage of making it a lower-fat cake).

The result was absolutely heavenly.  These are best served warm, so either drizzle the glaze over them while they're still cooling and consume right away, or store refrigerated and then reheat them in the microwave for 20 - 30 seconds before serving.  Cold, they are still pretty delicious, but they are a bit harder.  Warmed up, they practically melt in your mouth.  I was both sad and very, very glad that I had used the ratio to make only 4 cupcakes.  I shudder to think of myself in the alternate scenario, which would likely have resulted in my eating a full dozen of these.  That's another reason ratios are awesome - you can make as many - or as few - as you like.


Trust me, you will not be sorry you made these.  The commitment is minimal anyway - you can just make 4 to start and see how you like them.  It's perfect for girls living alone, or for you and just a few friends.  I'm pretty sure you'll want to get right back into your kitchen to make more, though.  It's hard to resist an old-fashioned favorite like rum cake.

Banana Rum Cupcakes with Rum Glaze
Makes 4 cupcakes - can easily be doubled, tripled, or quadrupled, or...you get the idea.

For the cupcakes:
25 grams Earth Balance Buttery Spread
25 grams very ripe banana (about 1/4 medium banana)
50 grams white sugar
1 egg
1/2 tsp. vanilla
1/4 tsp. rum extract
20 grams potato starch
15 grams tapioca starch
15 grams sorghum flour
1/2 tsp. baking powder
1/4 tsp. salt
1/8 tsp. xanthan gum (probably optional, but I didn't try the recipe without it)

For the rum glaze:
1 tsp. Earth Balance Buttery Spread
2 tsp. water
1.5 tbsp. white sugar
1/2 tsp. rum extract

Preheat the oven to 350 F.  Place 4 cupcake liners in a muffin/cupcake pan.

In a mixing bowl, combine the Earth Balance Buttery Spread and the banana.  Whisk together until smooth, then add the sugar and mix well.  Add the egg, vanilla, and rum extract and beat together.

In a separate small bowl, combine the tapioca starch, potato starch, sorghum flour, baking powder, salt, and xanthan gum.  Add to the wet ingredients and mix well.

Pour into the prepared cupcake liners and bake at 350 F for 15 - 17 minutes or until a toothpick or knife inserted into the cupcake comes out clean.  Mine took exactly 17 minutes.

Remove from the oven and let sit in the hot muffin pan for another 3 - 5 minutes (so they don't fall apart when you take them out).  Remove to a cooling rack and let cool the rest of the way, or until you can't stand it anymore and have to eat one.  When they are totally cool, poke a bunch of holes in the top with a fork and drizzle a good amount of rum glaze over the top so that it sinks into the cupcake.

Store in the fridge until ready to serve.  Microwave for a few seconds before serving.

To make rum glaze:  Combine the butter, water, sugar, and rum extract in a small saucepan and bring to a simmer.  Continue to simmer for 1 - 3 minutes or until it just starts to get thick.  Drizzle over the cooled cupcakes immediately (or it will get too thick to drizzle).

Here's a list of all of the other amazing cake recipes to come out of this month's Ratio Rally:

Basic White Cake by Kate at Gluten-free Gobsmacked
Boston Cream Pie by Britt at GF in the City
Chocolate Hostess Cupcake Dupes by Erin at The Sensitive Epicure
Chocolate Pistachio Pound Cake by Amie at The Healthy Apple
Coconut Boston Cream Pie Cupcakes by Gretchen at Kumquat-Blog
Confetti Cake by MaryFran at FrannyCakes
Czech Cherry Bublanina by Rachel at The Crispy Cook
Dark Chocolate Raspberry Cupcakes by Caroline at The G-Spot
Edna Lewis Busy-Day Cake by Shauna at Gluten-free Girl
Frangelico Cupcakes with Nutella by Lisa at Gluten Free Canteen
Fresh-Squeezed Lemon Cake by Caneel at Mama Me Gluten Free
Lemon Poppy Seed Muffins by Marla at Family Fresh Cooking
Lemon Tea Cake by Kate at KateAlice Cookbook
Mocha Buttercream Yellow Birthday Cake by Dr. Jean Layton at GF Doctor Recipes
Nina’s Hot Milk Cake by Charissa at Zest Bakery
Tiramisu Cake by TR Crumbley at No One Likes Crumbley Cookies
Traditional Birthday Cake by Karen at Cooking – Gluten Free!
Vanilla Cupcakes by Winnie at Healthy Green Kitchen
White Cake with Apricots & Blueberries by Brooke at B and the Boy
White Chocolate Cupcakes by Caleigh at Gluten Freek(k)

Monday, August 1, 2011

Banana Cream Pie Bites


I DARE you to eat only one of these.  Triple dog dare you.

I developed this recipe for the Boston Pie Experiment this last weekend.  It was a pie contest really (or maybe pie bonanza is a better way to describe it, with just under 30 different kinds of pies to be sampled), but I didn't enter to compete.  I kind of just wanted an excuse to bake a ridiculous number of pies and create a new recipe.

This recipe underwent many iterations over the last few weeks.  I tried almond milk and coconut milk (both vanilla and regular flavors). With and without gelatin.  With less Earth Balance and with more Earth Balance. As a whole pie and as tiny pie bites.  They were all delicious, but I finally settled on this recipe as the one that held up best under adverse conditions (read: outside of refrigeration for any period of time).  My co-workers tried it, and I made one for my friends for my birthday a few weeks ago.  It got rave reviews.

My personal goal was not to win the pie contest.  It was simply to have people like my pie, even though it was the ONLY gluten- and dairy-free pie amid 30 regular old gluten pies.

And they did.  I tried not to stare at people as they ate it, but I surreptitiously stole glances at them as they tasted this, an expression of surprise coming over their face as the flavors washed over them (first the lovely banana flavor topped with whipped soy cream, followed by the slight kick of the gingersnap crust).  I read their mouths through the din in the room as they commented to their friends, "That is REALLY good!" A few people came back for a second sample.  And one of the guys running the event even high-fived me after tasting it. 

It was a true test of taste to put a banana cream pie with a gluten-free crust and no cream (!) up against the buttery, flour-y, dairy-laden pies I was surrounded by.  But no one (that I saw) spit this out.  Most seemed to enjoy it, perhaps to their surprise.  And that's all the prize I wanted.


Banana Cream Pie Bites
This will make one regular banana cream pie or about 50 - 70 banana cream pie bites.

For the crust:
1 bag Trader Joe's Gluten-free Gingersnaps
2.5 tbsp. Earth Balance Buttery Spread

For the filling:
1 tbsp. brown rice flour
1 tbsp. sweet rice flour
1.5 tbsp. cornstarch
1/8 tsp. salt
1/2 cup + 3 tbsp. white sugar
3 very ripe medium bananas
3/4 cup So Delicious Vanilla Coconut Milk (Trader Joe's has a new vanilla coconut milk that works, too!)
1 packet Knox gelatin + 2 tbsp. hot water (don't mix until right before you're going to use it!!)
3 egg yolks, beaten
2 tsp. vanilla extract
1.5 tbsp. Earth Balance Buttery Spread

If desired: Soyatoo Soy or Rice Whip to top (totally optional!)

For a whole pie:  A regular pie dish.
For banana cream pie bites: Mini-cupcake liners.


Preheat the oven to 350 F.

Put the whole bag of gingersnaps and the 2.5 tbsp. Earth Balance in a food processor and blend until very smooth and crumbly.  You want these to be very tiny crumbs that are well-incorporated into the butter.

If you're making a whole banana cream pie:  Pour the crumb mixture into a pie dish and pat it evenly around the sides and bottom of the pan.  Make sure you pat it down very firmly.

If you're making banana cream pie bites: Place a heaping teaspoon of the mixture into each mini-cupcake liner.  Using your thumb or the teaspoon, press it down firmly into the cupcake liner, creating a little well for the banana cream. 

Separate your egg yolks and whisk them lightly in a medium-sized bowl.  Set aside.

Rinse the food processor out and blend the bananas and coconut milk together for about 3 - 4 minutes, or until very smooth.  In a large sauce pan, combine the brown rice flour, sweet rice flour, cornstarch, sugar, and salt and whisk together.  Add the banana and coconut milk mixture and whisk together.  Combine the Knox gelatin powder with 2 tbsp. of hot water, whisk together, and add immediately to the pot, stirring it in well (if you don't add it right away, it will become a block of gel).  Cook over medium heat, whisking constantly to avoid the flours settling, until it comes to a full boil.

When it comes to a boil, turn off the heat.  This is where it gets slightly tricky. You're going to add some of the hot mixture to the egg yolks, but just a tiny bit at a time, whisking each bit thoroughly into the eggs before adding more.  You're doing this to bring the temperature of the eggs up slowly so they don't cook or curdle on you.  Add about a tablespoon or less at a time until you've added about 1/3 of the banana cream mixture, and then return the egg mixture to the original pot and mix it in with the rest of the banana cream.  Return to medium heat and continue to whisk until it comes to a boil.  Boil for 2 more minutes (keep on whiskin'!) and then remove from heat.  Stir in the vanilla and Earth Balance Buttery Spread.

If you're making a whole banana cream pie: Pour the whole thing into the pie crust you prepared earlier.  Bake for 10 minutes at 350 F.  Remove from oven and let cool, then refrigerate for at least 4 hours to set.

If you're making banana cream pie bites:  Measure out a heaping teaspoon of banana cream for each pie bite. Bake for 6 - 8 minutes or until the edges of the crust are golden brown. If you're baking two trays at once, be sure to rotate them halfway through so they don't bake unevenly.  Let cool and then refrigerate for at least 4 hours to set.

No matter what kind of pie you're making: Top with Soyatoo Rice or Soy Whip and any leftover gingersnap crumbs before serving, if desired.  And try not to eat all of it yourself!